There are a multitude of micro-controllers available today, many of them advertised to be ‘Arduino Compatible’. Are these devices really worth considering, or should you just stick with genuine Arduinos? For the past few years I’ve had a chance to work with a good few of these devices, and I’ve discovered many advantages and disadvantages with each of them. Over the summer I got my hands on the Arduino 101; a relatively new Uno compatible micro-controller using Intel’s Curie module. Over the next couple of weeks I’ll be writing a number of tutorials about how to use some of Arduino 101’s features, but in this post I’ll look simply look at what it’s all about!
What makes Arduino 101 special?
What makes the Arduino 101 different than any of the other micro-controllers? Let’s look at a quick comparison between the Uno and the 101:
| Device | Arduino Uno R3 | Arduino 101 |
| Microcontroller | ATmega328P | Intel Curie |
| Operating Voltage | 5V | 3.3V (5V tolerant I/O) |
| Input Voltage (recommended) | 7-12V | 7-12V |
| Input Voltage (limit) | 6-20V | 7-20V |
| Digital I/O Pins | 14 | 14 |
| PWM Digital I/O Pins | 6 | 4 |
| Analog Input Pins | 6 | 6 |
| External Interrupt Pins | 2 | All pins |
| DC Current per I/O Pin | 20 mA | 20 mA |
| Flash Memory | 32KB | 196 KB |
| SRAM | 2 KB | 24 KB |
| EEPROM | 1 KB | None (Can be emulated) |
| Clock Speed | 16MHz | 32MHz |
| LED_BUILTIN | 13 | 13 |
| Features | – | Bluetooth LE, 6-axis accelerometer/gyro |
| Length | 68.6 mm | 68.6 mm |
| Width | 53.4 mm | 53.4 mm |
| Weight | 25 gr. | 34 gr. |
| Price | $24.95 | $30.00 |
(Source – www.arduino.cc, Prices on 22nd Oct 2016 – www.sparkfun.com)
Overview
The two devices are physically identical; they both are the same size and have the same renowned ‘Uno’ header layout. The Arduino 101 definitely wins out in terms of features; it has more flash memory and better interrupt support. The only place where the 101 is lacking is the number of PWM pins.
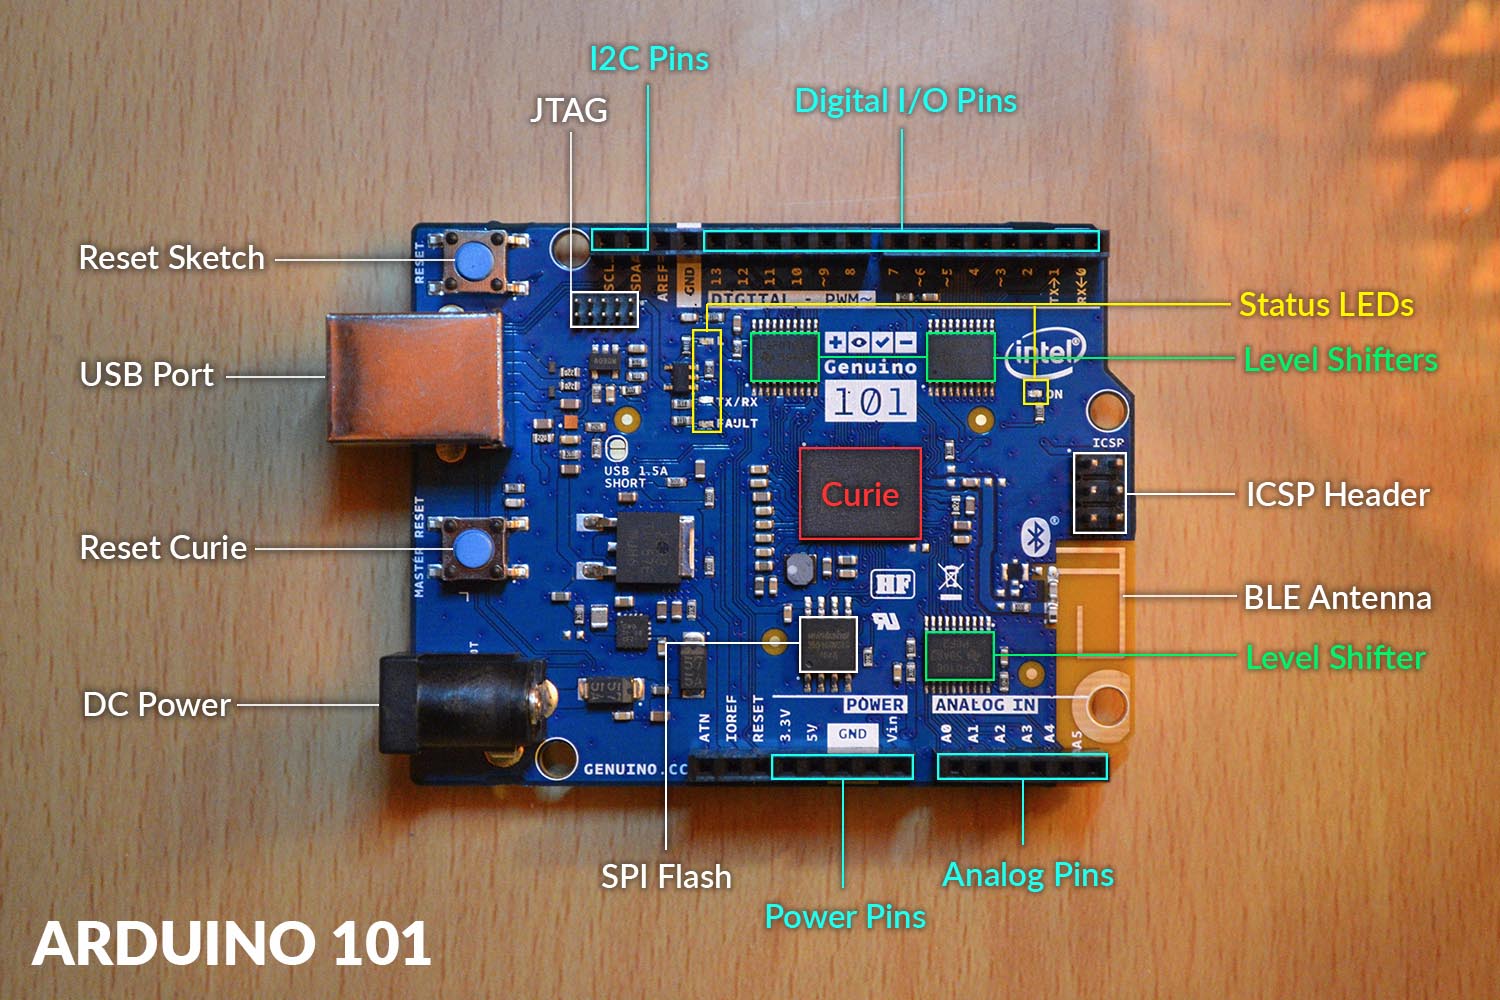
Input/Output Pins & Interrupts
The Arduino 101 has the same number of Digital and Analog I/O pins as the Uno. While it has less PWM pins than the Uno, it more than makes up for it in terms of interrupt pins. Many people who are new to micro-controllers don’t know the importance of interrupts, but they are extremely useful. For example if you have three buttons connected to the controller (with each of them attached to an interrupt), you know that the program definitely will notice the button being pressed, no matter what it is doing.
A cool feature with the Arduino 101 is that it also supports a software timing interrupt. If you #include “CurieTimerOne.h” library, you can set up an interrupt which runs repeatedly at a set time interval. This is really useful if you want to process sensor data at a regular rate, without having to write your own time-keeping function.
Accelerometer, Gyroscope, and BLE
The best feature of the Arduino 101 is that it has integrated Gyroscope, Accelerometer, and Bluetooth Low Energy (BLE) modules! If you were to buy these features separately as breakouts for the Arduino Uno, it would definitely add another $30 to the total cost. Therefore if you have a project in mind which uses any of these features, I’d encourage you to get the 101!
The accelerometer and gyroscope sensors are not the most accurate or sensitive ones I have ever used, but with some calibration and data processing, they should be good enough to cover most electronics projects.
I’ve used the BLE to connect the Curie to an Android phone. It can be quite awkward to get the BLE to work properly (especially on the Android side), but it definitely is possible. BLE is good for low-power communication at short ranges and low transfer rates, but it is not suitable for transmitting a large amount of real-time data (trust me, I’ve tried!). The Arduino sketch supports a number of interrupts for each of the main BLE events, such as connecting/disconnecting to a host and receiving new data.
Neural Network
The Intel Curie module also has a Neural Network Pattern Matching Engine, which can be used on the Arduino 101. I’ve looked around online, and there is very little documentation about what it is and how to use it. I happen to be one of the few people who has used it, so I will definitely be writing a tutorial about it soon…
Advanced Features
The software support for the Curie module is still an ongoing process, and not all of the features have yet been catered for. The Intel Curie module itself is actually quite interesting. It has two processor cores; one of them is an Intel Quark processor core that hosts the USB and other system level duties, while the other is an ARC core that runs the user sketches. Advanced users can compile their own firmware for the Curie (based on Zephyr) which provides access to all of its features, low power states, and cores. The Open Developer Kit (ODK) is available on Intel’s software download page.
Getting Started with the Arduino 101
The Arduino 101 is fully compatible with the Arduino IDE, so that makes creating sketches and uploading them to the device very simple. To get started, simply follow these steps:
- Download the Arduino IDE: https://www.arduino.cc/en/Main/Software
- Unzip the application, and install it on your computer.
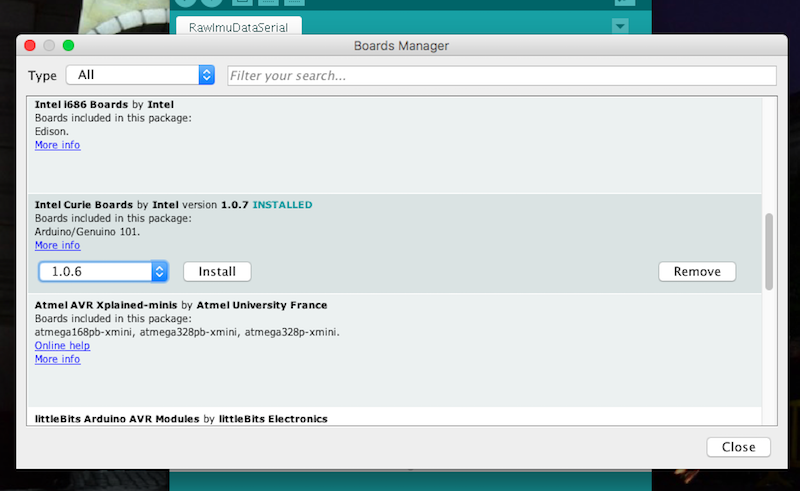
- Once the IDE is open, you need to install the drivers for the 101. To do this navigate to: Tools->Board->Boards Manager
- Scroll down in the window that appears until you find “Intel Curie Boards by Intel“. Click on it and install the latest version.
- You should now be good to go; I’d recommend you try out the “Blink” example sketch to make sure that everything is working.
- Some common issues are that you do not have the right board selected in the menu Tools->Boards, or that you don’t have the right comms port selected in Tools->Port.
Updated: 24th May 2019 – Reformatted post